Complete Guide to Flows in Zaptiva: Execution, Status, and Monitoring

Complete Guide to Flows in Zaptiva: Execution, Status, and Monitoring

1. What is Flow?

A Flow corresponds to one complete automation process. In ZAPTIVA it is an automated workflow that connects different applications (Apps) to perform task automatically.

Flow typically begins with a starting point, often called a trigger or start component. This defines how the process begins. After the start, one or more actions are added to the Flow. These actions determine what the system should do. Once executed, the Flow records whether the process completed successfully or failed, allowing you to monitor its performance.


In simple terms, a Flow is a set of instructions that tells ZAPTIVA what action to perform, where to perform it, and when to execute it. Instead of manually repeating the same task in different software systems, you can create a Flow once, and ZAPTIVA will handle the process automatically.

2. What do you mean by Apps and Actions?

 Apps

Apps are external and internal system that you connect inside ZAPTIVA to perform operations, it act as the source or destination of data in a flow.
   
An Apps provide different business tasks that can be used inside a flow. Apps in ZAPTIVA represents a software system that you connect in order to perform operations like:-
  1. Accounting Software (QuickBooks Online, QuickBooks Desktop, Sage Intacct)
  2. Spreadsheet tools (CSV, Microsoft Excel)
  3. Database (SQL Server, MySql, Postgre)
  4. File system (CSV, one drive local file storage)
  5. Flow Control Tools/ Zaptiva Utilities (Router, Filter, Iterator, Aggregator)
Actions

The Actions are specific tasks available inside each Apps. Inside every App, you will find multiple Actions. A Action is a specific task that the App can perform. If an App represents the system, then a Actions represents the task within that system.
  
For example, within an accounting App, you may find Actions such as creating a customer, retrieving customer records, updating invoices, or getting bill details. Each of these is a Action because it performs a defined task.
This Actions define what task the flow will perform and the flow is built by combining these actions from different apps.

3. Relationship between Flow, Apps & Actions.

The Relation between the Flow, Apps & Functions is:-
  • Flow = Complete automation process

  • App = Connected system within the flow

  • Actions = Tasks performed inside that system

In structured format:

          Flow
           └── App
              └── Actions

4.Managing and Monitoring Flows

Follow the steps below to Manage & Monitoring the flows:-

List of Flow

1. Navigate to the URL:  https://app.zaptiva.com/
2. Log in to your Zaptiva account.
3. Click on the Flow module from the left-hand menu. You will be redirected to the Flow List page.
    
4. On the Flow List page, you will see all created flows displayed in a list format. The page also shows the total number of flows along with the flow status.
    
5. Click the Create button at the top right of the Flow List page to create a new flow. You will be taken to the Create Flow page.
     

6. On the Create Flow page, you will see a Start node. Click the “+” icon next to it to open a sidebar that shows the list of available apps.
    

7. Select an app from the sidebar. Another panel will open showing the available actions for that app. Choose a action, and it will be added as a new step in your flow.
    

8. To open an existing flow, you can go to the Flow List page, click the More Actions option next to the flow, and select Edit.
    

How to run the flow

1. After creating a new flow or opening an existing one, click the Save button to make sure all changes are saved before running the flow.
    

2. After saving the flow, click the Run Once button to start it.
  • If your flow begins with a CSV or Excel function, a sidebar will open showing the details of the uploaded file. Click Preview & Run to view the uploaded records in a preview popup before the flow runs.

  • After reviewing the data in the preview screen, click the Run button. The flow will execute with displaying message "Flow executed successfully".

  • If your flow does not start with a CSV or Excel function, it will run immediately when you click the Run Once button, and no preview screen will be shown.

How to check status of last flow run

1. To check the status of the last flow run, open the flow and click the History icon on the flow screen.
    

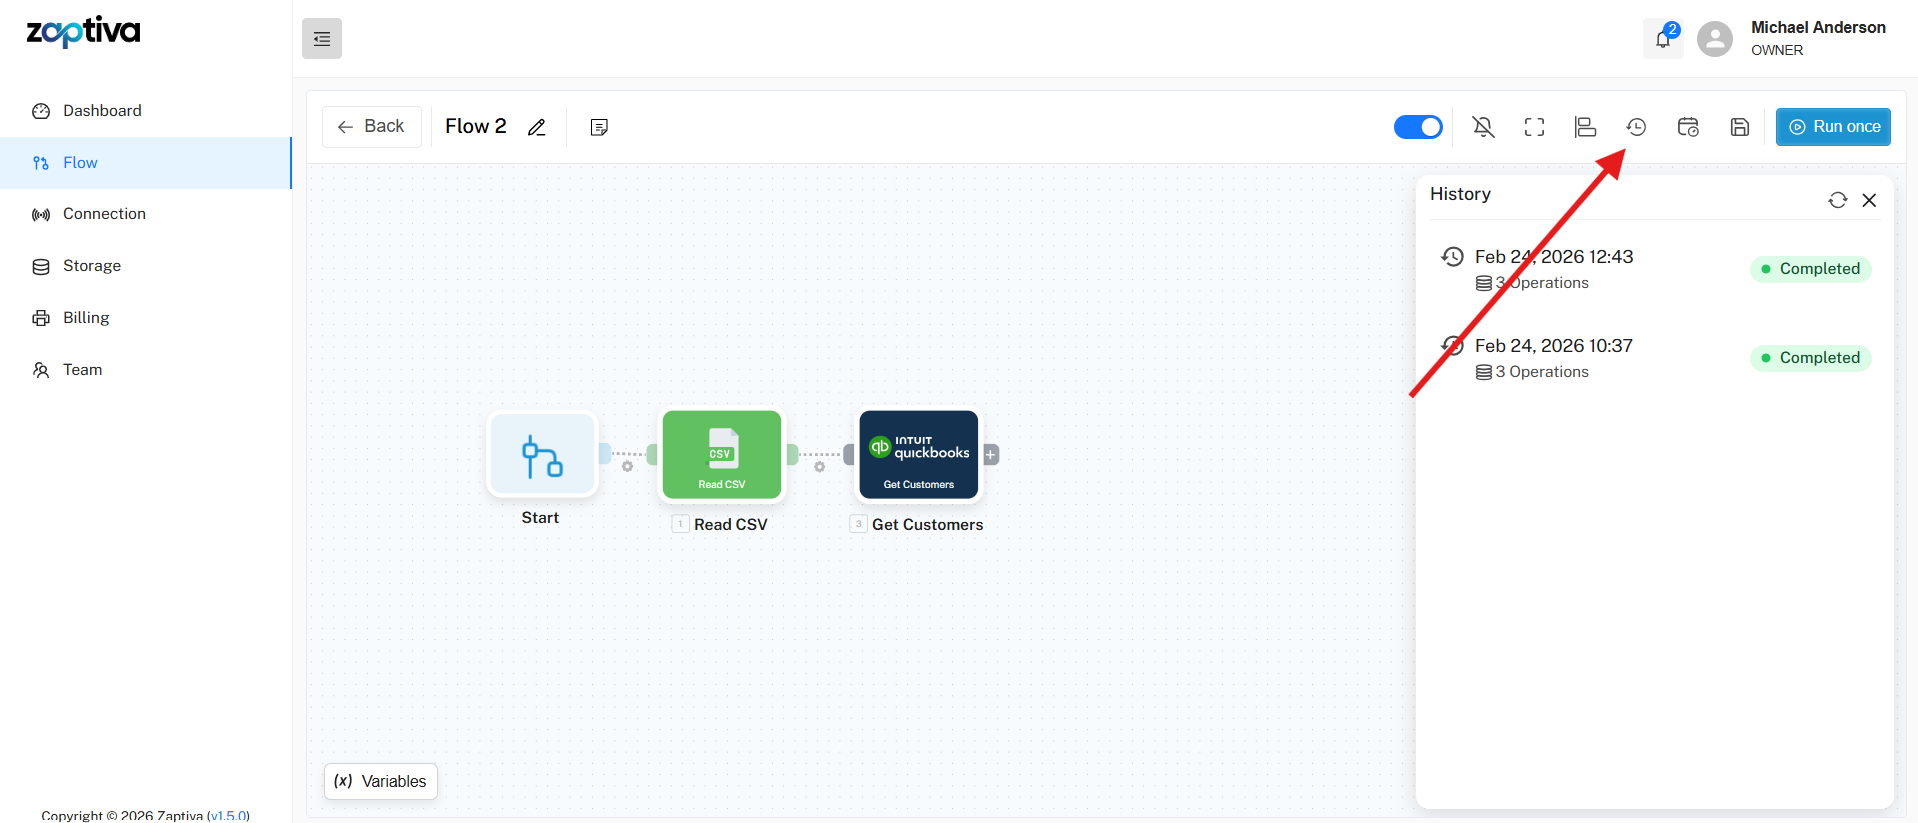
2. After clicking the History icon, a sidebar will appear showing all runs of that flow. Click on any run to view its status and details.

How to see success/failure of flow run

1. Once the flow execution is completed, click the History icon to view the list of executed runs.
    

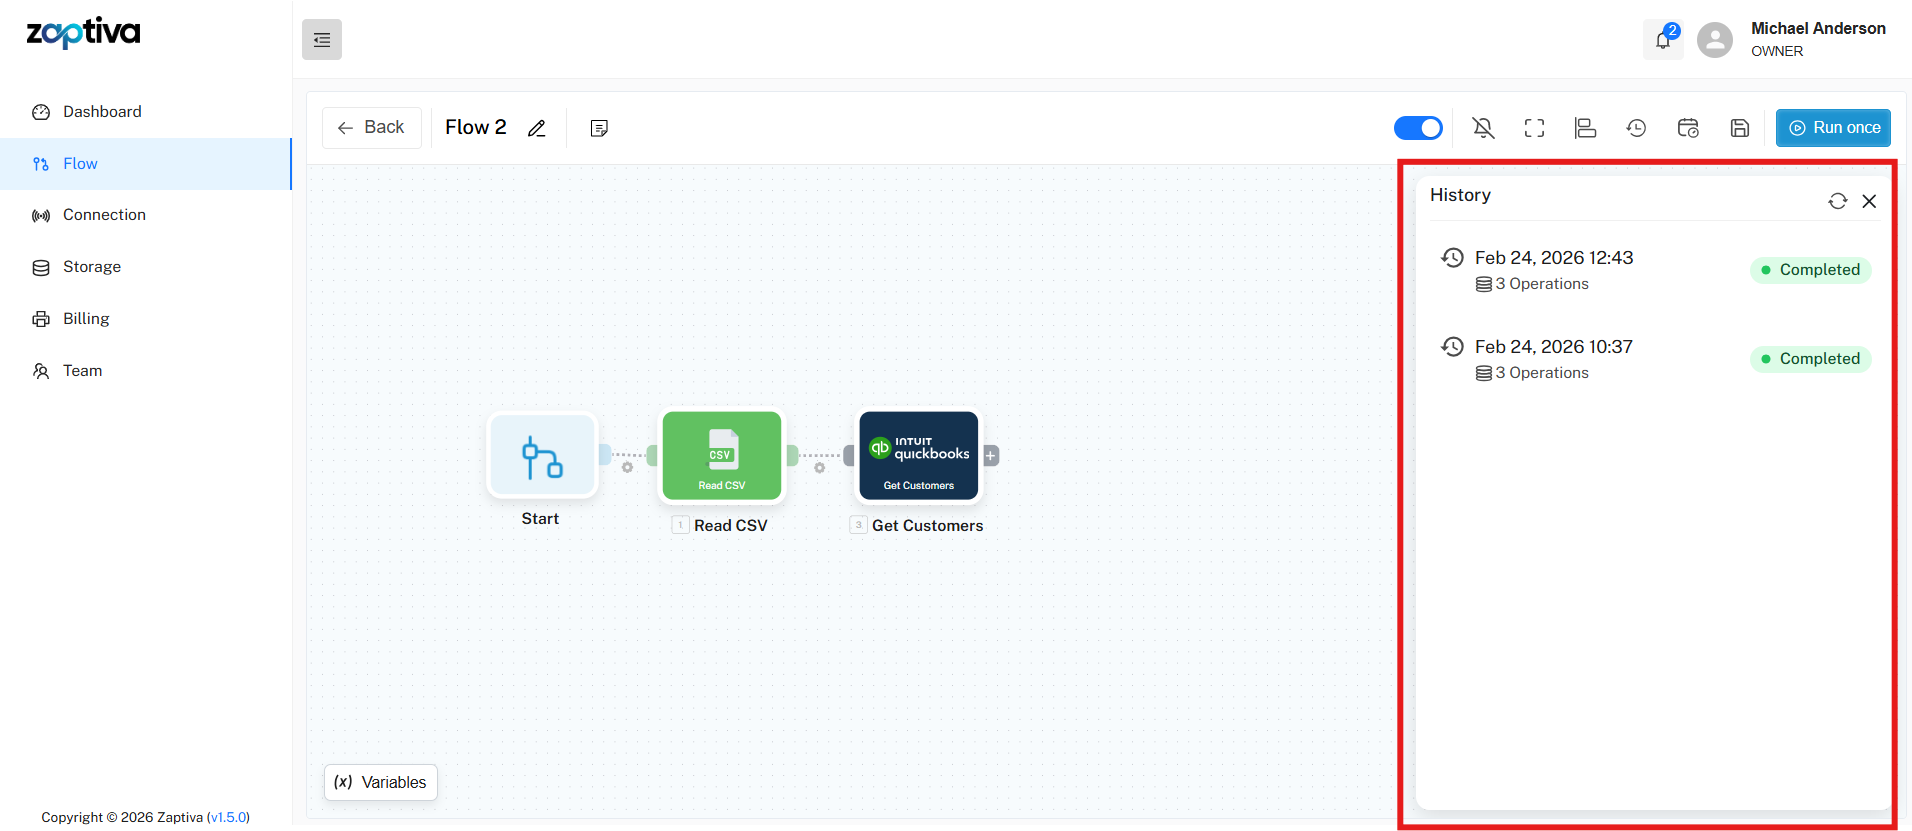
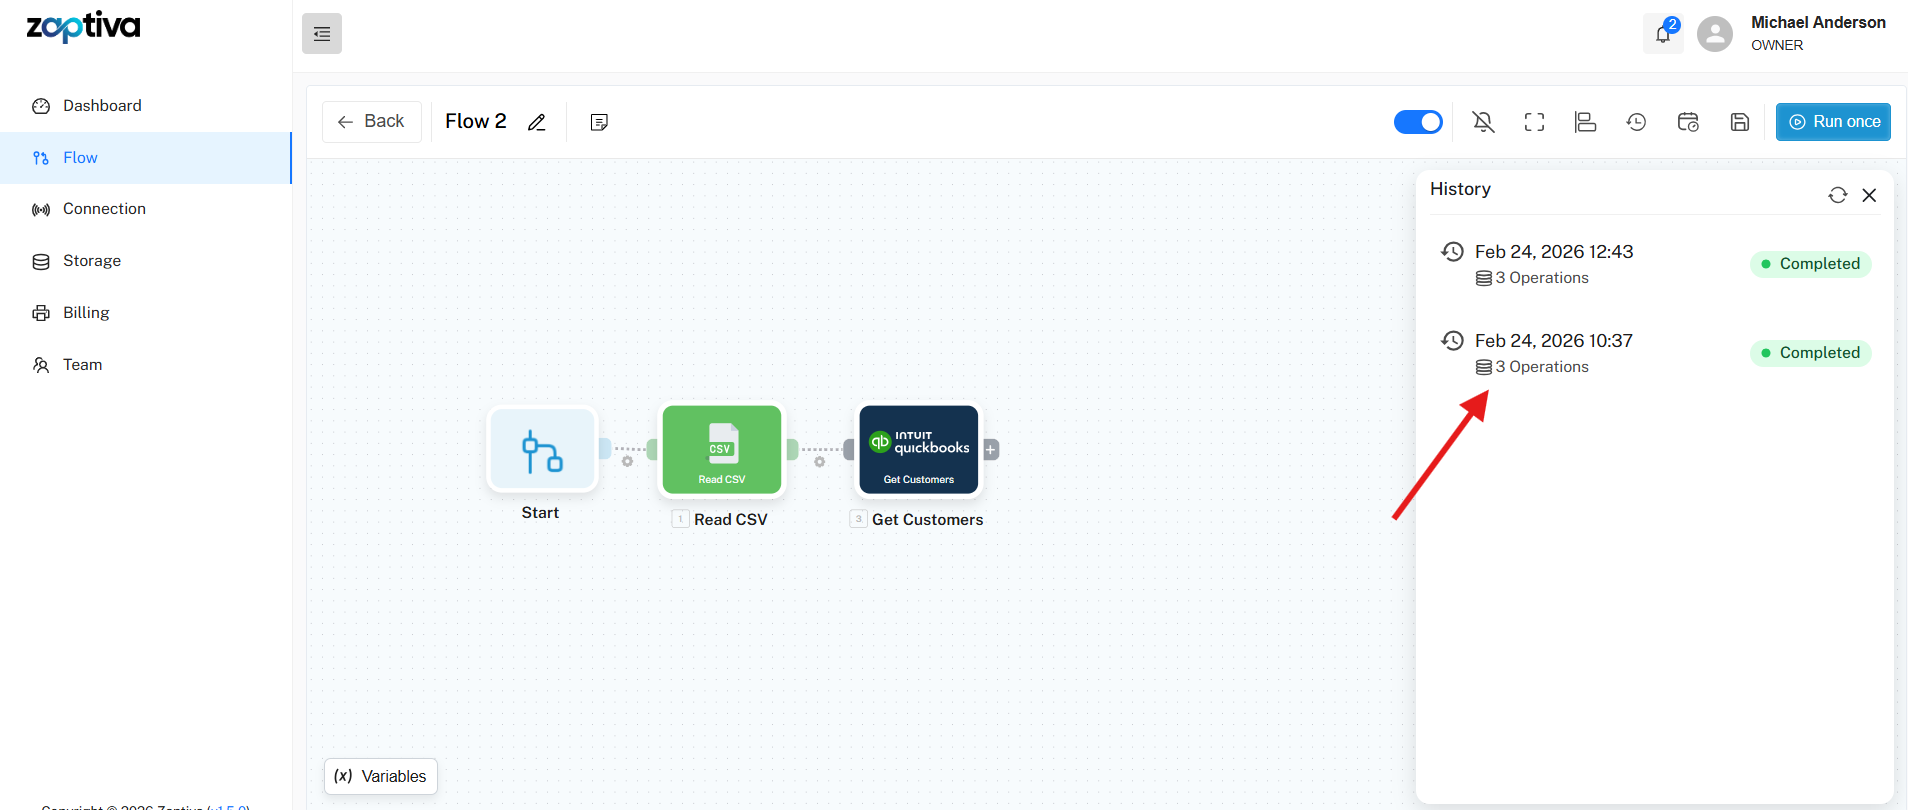
2. Click on the run whose history or success/failure status you want to view.
    

3. After clicking on a run, the history batches will appear above each action in the flow, and a sidebar will open displaying all run history details.
   

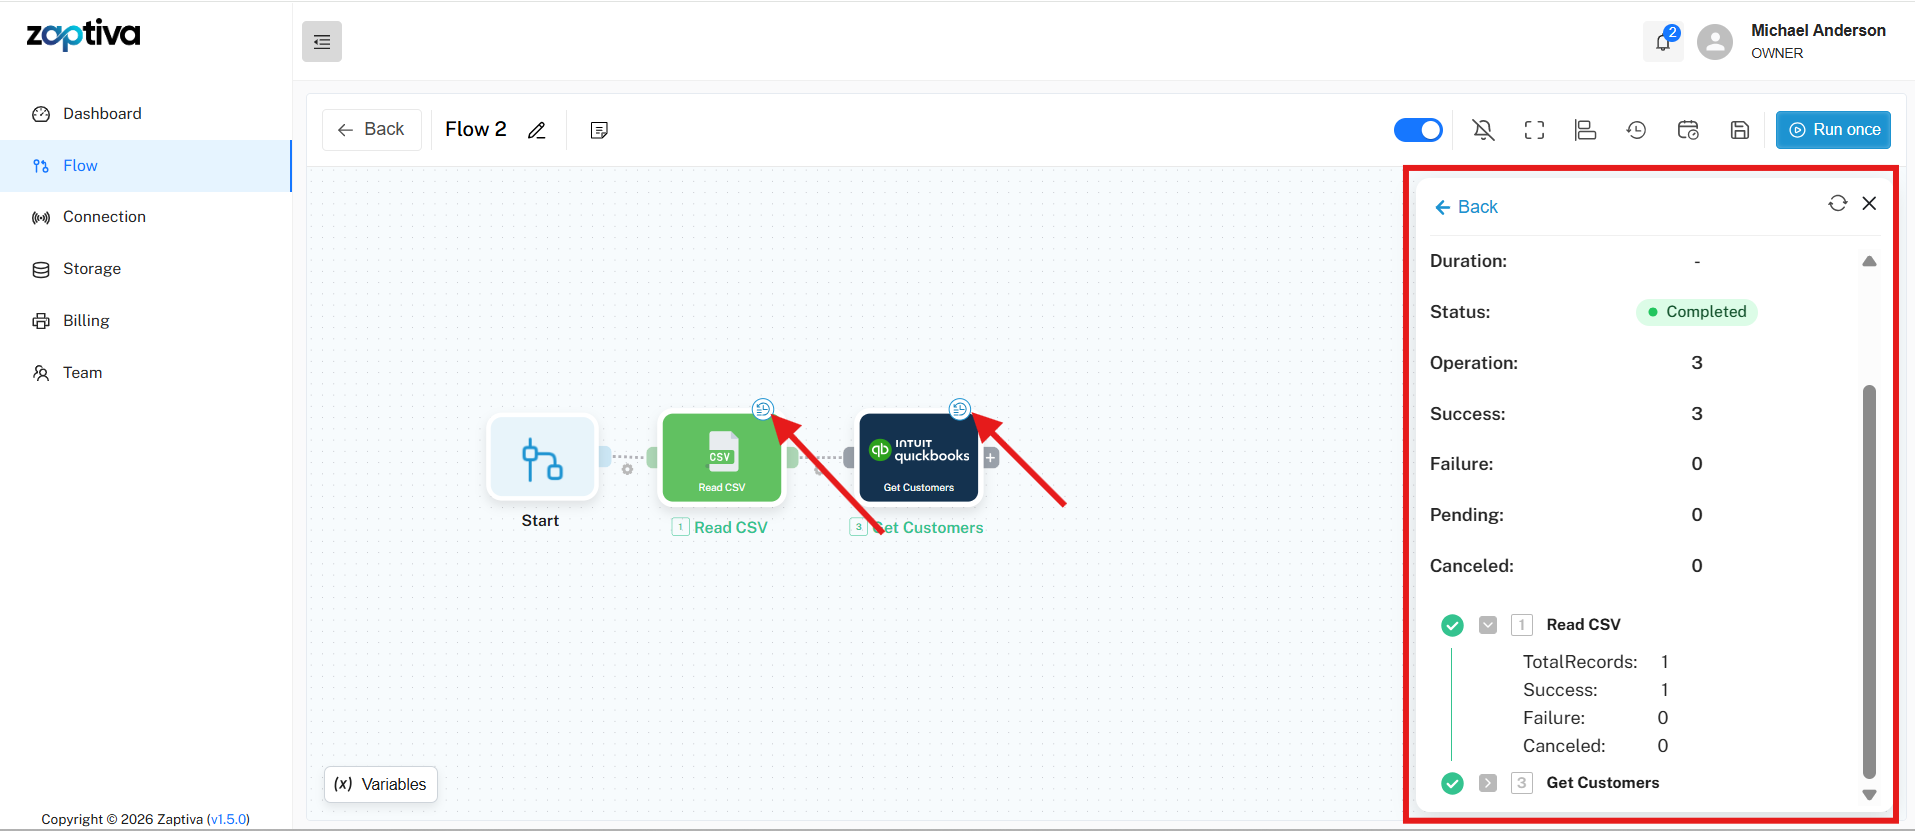
4. To view the success and failure records for a specific function, click the History icon displayed on that action.
    

5. When you click on a history batch for a specific function, a popup will open displaying all the success and failure records for that function, along with filtering options.
    

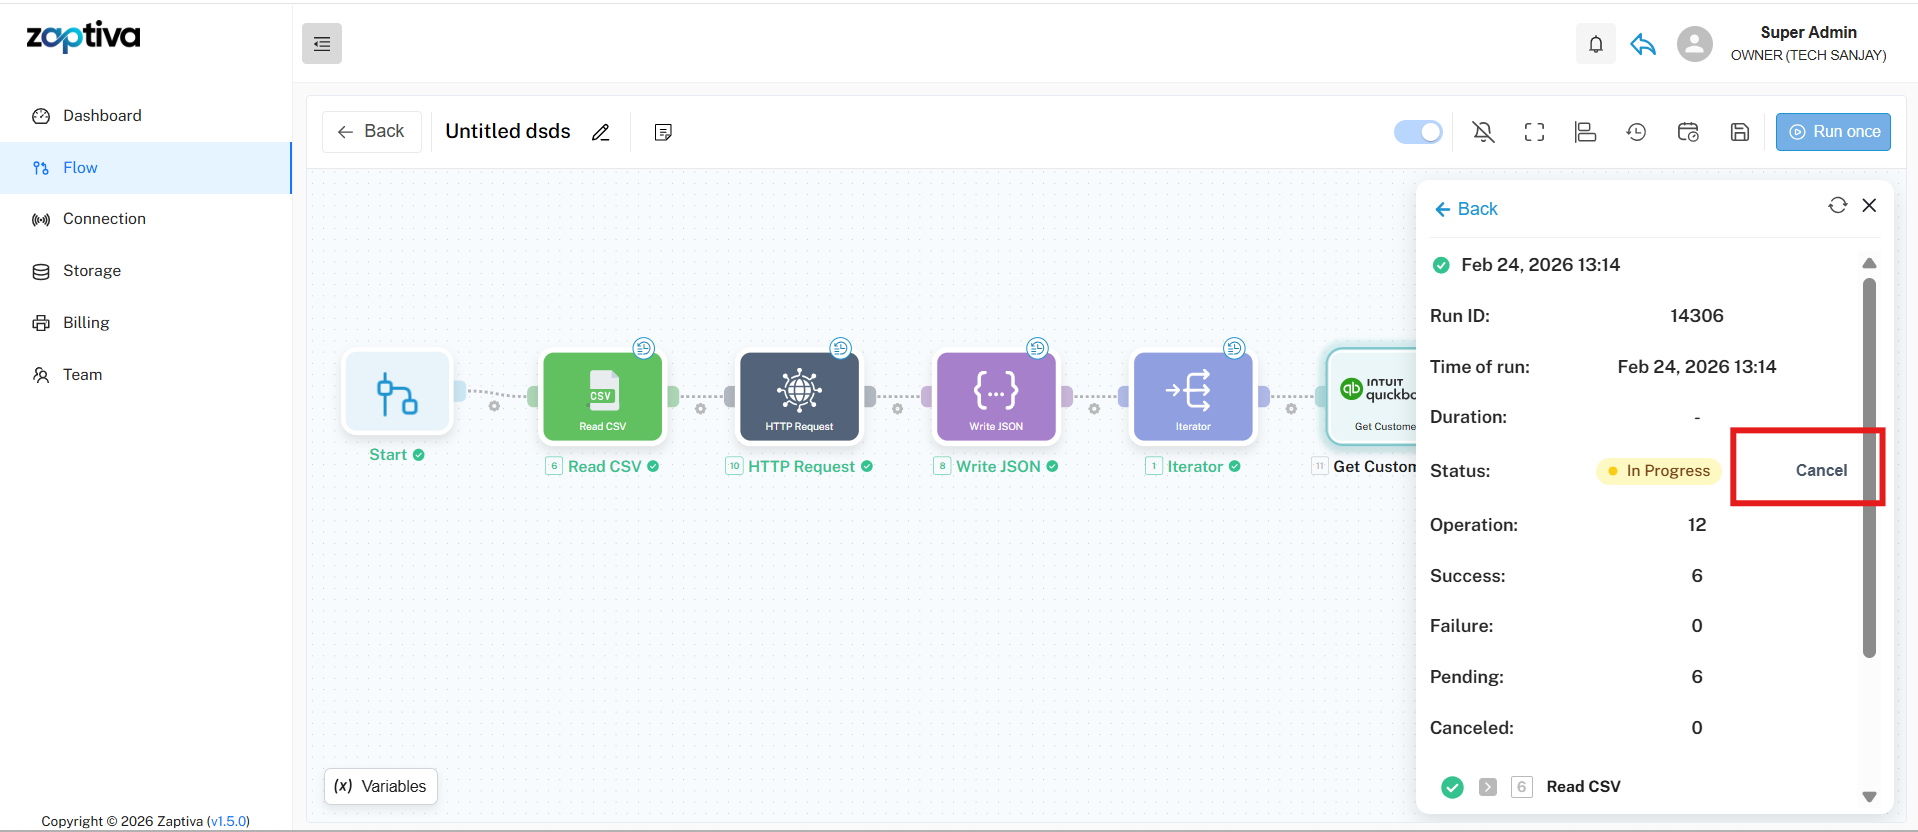
How to cancel a flow in running state

1. When a flow is running, a sidebar opens showing the flow details and its current status. A Cancel button appears next to the status. Click the Cancel button to stop the running flow.
    

2. You can also cancel a running flow from the Flow Runs List sidebar, which appears after clicking the History icon. Click the Cancel button next to the run to stop the execution.


    • Related Articles

    • Notifications in Zaptiva: Overview and User Guide

      1. Notifications in Zaptiva Notifications in Zaptiva help users stay informed about important activities, updates, and system events in real-time. These alerts ensure that users never miss critical actions such as Renewal Subscription status, ...
    • Zaptiva Release Notes

      v2.13.1 Beta Release Date: Feb 19, 2026 MAJOR FEATURE: Introduced a new module named "User Log" for Super Admin to view user activity logs. Introduced two new operations, "Get Balance Sheet" and "Profit & Loss", under QuickBooks Desktop. Enhanced the ...
    • Zaptiva Usage Parameters

      Usage Metering in Zaptiva This article defines how usage is metered in Zaptiva. Summary Flow Runs — how many times a Flow executes per month. Operations — countable steps executed inside a Flow (loop iterations included). AI Credits — metering for AI ...
    • QuickBooks Web Connector: Complete Guide (Open, Auto Run, Kill & Reopen)

      1. What is QuickBooks Web Connector? QuickBooks Web Connector (QBWC) is an application that allows external web applications to communicate with QuickBooks Desktop. It acts as a bridge between QuickBooks Desktop and third-party applications such as ...
    • How to manage Subscription and Payment Method in Zaptiva.

      Managing Billing & Payment Methods in Zaptiva Follow the steps below to manage Billing & Payment Methods in Zaptiva: 1. Navigate to the URL: https://app.zaptiva.com/ 2. Log in to your Zaptiva account. Billing & Subscription Update Payment Method ...